

North American Bat Monitoring Program (NABat) Mobile Acoustic Transect Surveys Standard Operating Procedure 3—Conducting Mobile Transect Surveys
Links
- Document: Report (1.19 MB pdf) , HTML , XML
- Related Works:
- USGS Techniques and Methods 2-C1— North American Bat Monitoring Program (NABat) Mobile Acoustic Transect Surveys Standard Operating Procedure 1—Locating and Establishing Mobile Transect Routes
- USGS Techniques and Methods 2-C2— North American Bat Monitoring Program (NABat) Mobile Acoustic Transect Surveys Standard Operating Procedure 2—Field Season and Survey Preparation
- Download citation as: RIS | Dublin Core
Acknowledgments
Prepared in collaboration with the North American Bat Monitoring Project (NABat) Mobile Transect Working Group, Department of Defense, U.S. Department of Agriculture Forest Service, Department of Biology at the University of North Carolina at Greensboro, New Jersey Division of Fish and Wildlife Endangered and Nongame Species Program, Georgia Department of Natural Resources, and the Wildlife Conservation Society Canada. Thank you to all members of the working group for your review and feedback of this manuscript.
Abstract
This standard operating procedure (SOP) provides instructions and considerations for conducting mobile acoustic surveys along road transects to collect bat acoustic data following the North American Bat Monitoring Program (NABat) protocol and sample design. This report discusses measures for ensuring the safety of surveyors and efficiency of mobile transect surveys. This guidance is intended to aid surveyors in equipment setup and operation, including how to mount and orient equipment. Finally, this document provides guidance on driving the route, performing end of survey procedures, and steps for data management.
Introduction
This standard operating procedure (SOP) describes step-by-step procedures for conducting a mobile transect route and is intended for staff that will be conducting mobile surveys in the field (fig. 1). It is the third of a three-part series on conducting mobile surveys of bat acoustic data for the North American Bat Monitoring Program (NABat). SOPs 1 (Martin and others, 2022a) and 2 (Martin and others, 2022b) of this series provide guidance on establishing mobile transect routes and preparing for the field, respectively, as well as considerations for choosing a detector and microphone.
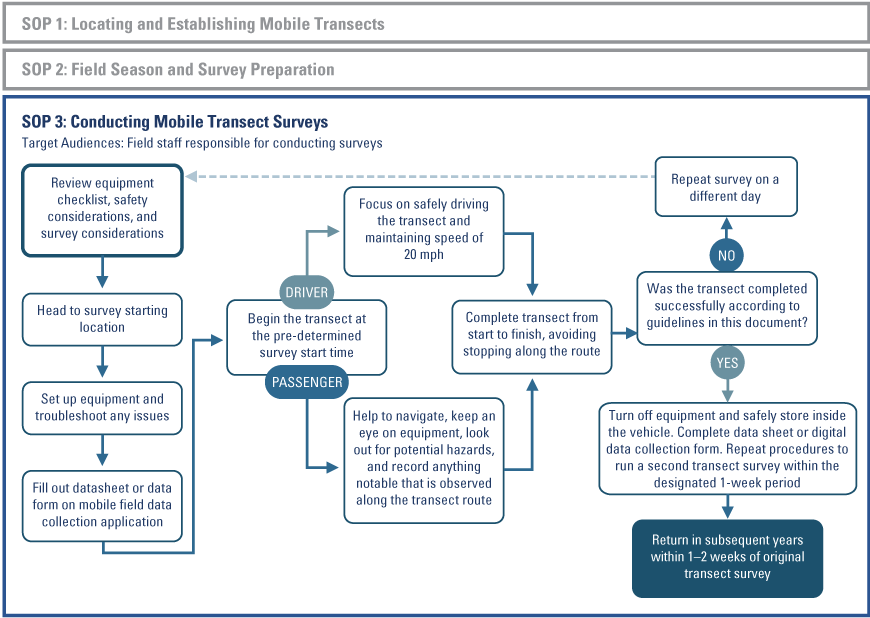
The workflow for conducting mobile acoustic transect routes, as detailed in this report.
Before Heading into the Field
Prior to the survey night, confirm that you have all necessary equipment and materials and are prepared to complete your mobile transect route(s). A list of recommended equipment is provided in the checklist (table 1). Reference the information provided at the end of this document, in the section titled “Important Considerations,” prior to heading into the field to help ensure the efficiency of mobile transect surveys and the safety of field staff.
Table 1.
Equipment checklist for conducting a mobile transect survey.[GPS, Global Positioning System; NABat, North American Bat Monitoring Program]
Conducting the Mobile Transect Survey
Arrive at the starting location with enough time to set up, begin filling out the datasheet (and Survey123 form if using), and troubleshoot any issues as needed.
Equipment Setup
-
• If available, attach a reflective sign to the vehicle to indicate that a survey is in progress and that the vehicle will be moving at slow speeds.
-
• Wipe off the vehicle’s roof at the area where the equipment will be mounted. This will remove any dirt and debris that might prevent the mount from making an adequate connection to the vehicle.
Mounting a Detector With an External Microphone and GPS
-
• Place the detector inside the vehicle, with the screen facing upwards. The detector can be secured to the vehicle’s dashboard or held by the passenger.
-
• Securely mount the external microphone to the roof of the vehicle, on the highest point of the roof to avoid interference from the vehicle’s sides. The microphone can be facing straight up or oriented at a 45-degree angle and directed towards the back of the vehicle to minimize the amount of wind picked up due to the vehicle’s movement (figs. 2, 3, and 4).
-
• Connect the detector to the microphone by attaching an extension cable to the detector inside the vehicle, feeding the extension cable through a half-inch opening in the passenger side window, and connecting the other end to the microphone on top of the roof.
-
• Take caution not to pull, pinch, or slam cables when opening or closing doors or windows.
-
• If using an external GPS, this can either be kept inside the vehicle (for example, secured to the dashboard with tape or another adhesive) or mounted on the roof during the survey.
-
• For GPS devices that require an external antenna, place the antenna on the roof of the vehicle while the GPS device itself is secured within the vehicle. If cables are required to power or connect the GPS to the detector, run cables through the passenger window, similar to the microphone cable.
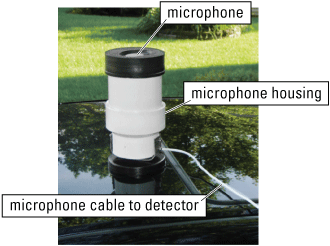
Example of an external microphone mounted to the center of the vehicle rooftop, with an extension cord connecting the microphone to a detector inside the vehicle. Image courtesy of Carl Herzog with the New York State Department of Environmental Conservation.

Example of an Echo Meter Touch 2 Pro™ detector and microphone mounted to a vehicle with a microphone clip and suction cup mount and oriented at a 45-degree angle. Image courtesy of Han Li with the Department of Biology at the University of North Carolina at Greensboro.

Example of an Anabat SD2 external microphone mounted to a vehicle and oriented at a 45-degree angle. Note that the microphone is directed towards the back of the vehicle to minimize the amount of wind picked up due to the vehicle’s movement. Image courtesy of Han Li with the Department of Biology at the University of North Carolina at Greensboro.
Equipment Operation
Once all equipment is set up and securely mounted, proceed with the following steps:
-
• Activate the GPS device and allow it time to acquire a good satellite connection.
-
• Turn on the detector and verify that it is picking up sound by snapping or rubbing fingers or jingling keys in front of the microphone.
-
• Verify that the GPS device is activated and has made a connection to satellites.
-
• Verify that the location and time on the GPS match the detector, if possible. The GPS should be set to record the coordinates of each bat call for the duration of the survey.
Running the Route
-
• Turn the detector on and begin recording at the predetermined start time. Follow guidance provided in SOP 2 (Martin and others, 2022b).
-
• Begin driving along the transect route, maintaining a slow, consistent speed of 20 miles per hour (mph) until the survey end point.
-
• Record any relevant observations—such as route changes due to road closure or missed turns, areas of high interference or insect noise, areas with wet roads or difficult driving conditions, and so forth—on the datasheet as you drive the route, along with the survey time(s) of each observation.
-
• If you need to stop the survey or have diverted from the transect route, keep all equipment running, especially the GPS device. This can facilitate the removal of any recordings collected off route. Do not remain stopped for longer than 10 minutes, as this will require that the survey be rerun on a later date. As soon as you are able, return to the route at the point where you left off, if possible, and proceed with the survey. Make a note of any deviations or stops on the datasheet or form and notify the appropriate staff.
End of Survey Procedures
Immediately upon finishing the route complete the following steps:
-
• Pull off the road to a safe location and record the exact survey end time.
-
• Confirm the detector was recording for the duration of the route by rubbing your fingers in front of the microphone. Some detectors display the number of files or gigabytes of data recorded, giving further assurance that things worked properly.
-
• Verify that the GPS device recorded your final position, if possible.
-
• Stop the detector from recording and turn off the GPS, if separate.
-
• Carefully remove the detector, microphone, and GPS device from external mounts and store in a secure location.
-
• Remove all mounting equipment and signs, if applicable.
-
• Make note of any damage to cords, microphone, or the detector unit, and alert the survey coordinator as soon as possible.
-
• Complete any remaining fields on the datasheet, including ending weather conditions.
-
• Store paper datasheets in a safe place where they will not be lost or damaged.
-
• Complete and submit the Survey123 form, if using, or save the form and submit it when an internet connection can be established.
-
• Repeat procedures to run a second transect survey on another night within one week.
Data Management and Submission
After completing all necessary surveys, complete the following steps:
-
• Organize and submit datasheets and memory cards containing acoustic data to the appropriate staff following your organization’s guidelines.
-
• Charge all batteries and equipment as needed and return to the appropriate staff.
-
• If processing acoustic data or submitting data directly to NABat, follow guidance for processing transect data in the “Guide to Processing Bat Acoustic Data for NABat,” available at https://www.nabatmonitoring.org. The NABat Coordinating Office also offers virtual trainings annually. Contact the NABat Coordinating Office, available at https://www.nabatmonitoring.org/our-team, to inquire about these resources.
Important Considerations
-
• Driving speeds during the survey should not exceed 20 mph.
-
• While traffic is typically lighter during the late evening and on more rural routes, it is important to be prepared should you encounter other vehicles while surveying. Use the vehicle’s headlights and hazard lights for the duration of the survey to ensure road visibility and alert other drivers of your presence.
-
• The regional hub, State, or survey coordinator should provide a reflective sign for your vehicle to alert other drivers of the survey and slow travel speeds.
-
• Be aware of vehicles approaching from behind and pull off the road to a safe, convenient spot to allow other motorists to pass, as necessary. Once the vehicle has passed, verify the road is clear before pulling back onto the route to continue the survey. It can be useful to make note of when and how often this happens on the datasheet.
-
• It is strongly encouraged to complete surveys in teams. The hub or survey coordinator is responsible for arranging personnel into suitable teams. Having a partner in the passenger seat allows the driver to focus solely on the road while the passenger assists with navigation, calls out driving directions, and tends to the equipment and datasheet. During the survey, the passenger should use a flashlight, headlamp, or red light to view the datasheet and examine equipment. Avoid turning on the overhead vehicle lights to reduce interference with the driver’s visibility.
-
• Emergency preparations such as jumper cables, a spare tire, and a fully charged cell phone to contact the hub or survey coordinator or appropriate staff are highly recommended.
-
• Look over your vehicle for potential sources of additional noise (for example, loose items in a truck bed) and remove or mitigate them if possible.
-
• It is critical to begin as close to the calculated start time as possible, as deviating from this time can impact your ability to detect activity of the target species. If you end up deviating from the calculated start time, refer to the “FAQ” section for additional guidance.
-
• The microphone must be oriented in the same manner throughout the survey period and from year to year. Therefore, choose an orientation that is suitable for the microphone type and that will be easy to replicate across surveys.
-
• Exceeding 20 mph creates wind distortion in the microphone which can interfere with the recording of bat calls. Additionally, driving too slow increases the likelihood of recording the same bat more than once, as bats may fly at speeds between 5–23 mph or greater, depending on the species (Hayward and Davis, 1964; Patterson and Hardin, 1969; Kennedy and Best, 1972). This violates the assumption that each call sequence represents a single bat and impacts the ability of the data to provide an index to abundance (Roche and others, 2011).
Frequently Asked Questions
-
What if I arrive late to start the route?
-
What if I miss a turn or need to divert from or stop the route?
-
Briefly stopping or going off route for a short period of time is not an issue if the delay is less than 10 minutes; longer delays will require you to redo the route on another date. As soon as possible, return to the route at the point where you left off and resume the survey. Make a note of any deviations or stops on the datasheet or form and notify the hub or survey coordinator or appropriate staff.
-
-
What do I do if it starts to rain during the survey?
-
If the rain is light, pull off the route to a safe location and wait for the rain to pass. Ensure that the microphone and any other equipment mounted to the roof of the vehicle are protected from the rain to prevent damage. If the rain persists and you are delayed from continuing the route for more than 10 minutes, you are required to redo the route on another date. If this occurs, record the time you stopped the survey, remove all equipment, make note of the situation on the datasheet or form, and notify the hub or survey coordinator or appropriate staff.
-
References Cited
Hayward, B., and Davis, R., 1964, Flight Speeds in Western Bats: Journal of Mammalogy, v. 45, no. 2, p. 236–242., accessed January, 2021, at https://doi.org/10.2307/1376986.
Kennedy, M.L., and Best, T.L., 1972, Flight speed of the gray bat, Myotis Grisescens: The American Midland Naturalist, v. 88, no. 1, p. 254–255. [Also available at https://doi.org/10.2307/2424507.]
Loeb, S.C., Rodhouse, T.J., Ellison, L.E., Lausen, C.L., Reichard, J.D., Irvine, K.M., Ingersoll, T.E., Coleman, J.T.H., Thogmartin, W.E., Sauer, J.R., Francis, C.M., Bayless, M.L., Stanley, T.R., and Johnson, D.H., 2015, A plan for the North American Bat Monitoring Program (NABat): U.S. Department of Agriculture General Technical Report SRS-208, 100 p., accessed February, 2021, at https://doi.org/10.2737/SRS-GTR-208.
Martin, J., Rae, J., Hall, M., Ferrall, E., Li, H., Straw, B., and Reichert, B., 2022b, North American Bat Monitoring Program (NABat) mobile acoustic transect surveys standard operating procedure 2—Field season and survey preparation: U.S. Geological Survey Techniques and Methods 2C-2, 9 p., https://doi.org/10.3133/TM2C2.
Martin, J., Smith, D., Li, H., Hall, M., Ferrall, E., Rae, J., Straw, B., and Reichert, B., 2022a, North American Bat Monitoring Program (NABat) mobile acoustic transect surveys standard operating procedure 1—Locating and establishing mobile transect routes: U.S. Geological Survey Techniques and Methods 2C-1, 7 p., https://doi.org/10.3133/TM2C1.
Patterson, A.P., and Hardin, J.W., 1969, Flight Speeds of Five Species of Vespertilionid Bats: Journal of Mammalogy, v. 50, no. 1, p. 152–153., accessed February, 2021, at https://doi.org/10.2307/1378653.
Roche, N., Langton, S., Aughney, T., Russ, J.M., Marnell, F., Lynn, D., and Catto, C., 2011, A car-based monitoring method reveals new information on bat populations and distributions in Ireland: Animal Conservation, v. 14, no. 6, p. 642–651., accessed February, 2021, at https://doi.org/10.1111/j.1469-1795.2011.00470.x.
Suggested Citation
Martin, J., Hall, M., Ferrall, E., Li, H., Rae, J., Straw, B., and Reichert, B., 2022, North American Bat Monitoring Program (NABat) mobile acoustic transect surveys standard operating procedure 3—Conducting mobile transect surveys: U.S. Geological Survey Techniques and Methods 2–C3, 6 p., https://doi.org/10.3133/tm2C3.
ISSN: 2328-7055 (online)
| Publication type | Report |
|---|---|
| Publication Subtype | USGS Numbered Series |
| Title | North American Bat Monitoring Program (NABat) mobile acoustic transect surveys standard operating procedure 3—Conducting mobile transect surveys |
| Series title | Techniques and Methods |
| Series number | 2-C3 |
| DOI | 10.3133/tm2C3 |
| Year Published | 2022 |
| Language | English |
| Publisher | U.S. Geological Survey |
| Publisher location | Reston, VA |
| Contributing office(s) | Fort Collins Science Center |
| Description | vi, 6 p. |
| Online Only (Y/N) | Y |
| Google Analytic Metrics | Metrics page |